rhino models
FALL 2020
MASHRABIYA MORPHOLOGY
.png)
.png)
.png)
.png)
ITERATIONS
.png)
.png)
.png)
.png)
PATTERNS
.png)
Mashrabiya is a traditional architectural element in the Islamic world. It would be a kind of patterned screen that would be added onto exterior elements of the structure. I constructed my own version by creating different individual modules first and then repeating these modules and changing their orientation to create unique patterns using the same module. This taught me that simple designs can be elevated through simple techniques. As well as the Boolean commands and how they can be used to make intricate designs. Lastly, how volume of an object has to balanced to ensure aesthetically pleasing results. I could've made a abstract and eye catching by getting inspiration from Islamic culture.
grafting
.png)
.png)

.png)
.png)
EXPLODE AXON
STEPS
SECTIONS
The idea of grafting is inserting one object into another. In this particular assignment I had to create a NURB curve that would barely touch the bottom and top curve at certain points. This process taught me about working with curves and introduced me into the world of parametricism. With this method and the knowledge I gained from constructing the mashrabiya, I can confidently create complex parametric structures. As well as how to use commands that wouldn't normally be used like extract iso curves.
SOLIDS

.png)
).png)
).png)
The solids assignment had the class be divided in half, each team member would have to create their own version of their assigned chess piece. I was responsible for the two bishop pieces. The theme that our team chose was the 4 elements and nature overall. I went with the fire element and took inspiration from desert plants, like cactuses. I learned the restrictions that are put on when needing to 3D print a model. As well as how a variety of shapes and forms are used to create simple yet complex designs. I could've made the design more complex by adding different geometries onto on of the bishops.
STEREOtoMY
.png)
.png)
.png)
.png)
.png)
.png)
.png)
.png)
STEPS
%20LAYOUT1.png)
%20LAYOUT2.png)
%20LAYOUT3.png)
laser cutter layouts
Stereotomy is cutting 3 dimensional solids into particular shapes. I wanted to re-create a famous consoles as I really wanted to be able to 3D model it but as well as be able to use a laser cutter to assemble it in real life. I wasn't too successful yet of creating it in real life, but continue to work on getting it to work out. With this I was able to discover a method of organizing my work properly and help me better understand certain functions of everyday objects.
anamorphic projection
.png)
.png)
.png)
steps
.png)
.png)
.png)
final results
An anamorphic projection is the illusion, where someone would have to stand at a certain point in order to see a image/sculpture correctly. If the person stands elsewhere then the image is distorted. This was done by tracing the projection on a wall or using smaller objects grouped a certain way to create the image. I chose these chevron shapes that are sandwiched together to add a bit of a challenge as most of them have small gaps that still need to be displayed. Learning would be useful when trying to create interior artwork of a house or structure to make the build more sophisticated.
curtain wall house v.1
.png)
.png)
.png)
.png)
.png)
.png)
.png)
.png)
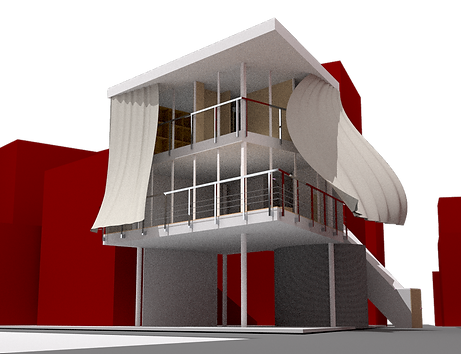
This case study project had us look at the Curtain Wall House located in Japan. The project was more architecture based and had us re-create the interiors, exteriors, and smaller elements. Being the first ever 3D model I built of a full house it taught me about creating spiral staircases, lighting in renders, what materials go together and scaling. What had to be done better was attention to detail when creating the surroundings, the staircase leading to the outside is opening on the road.
curtain wall house v.2
.png)
.png)
.png)
.png)
curtain steps
.png)
.png)
.png)
.png)
views
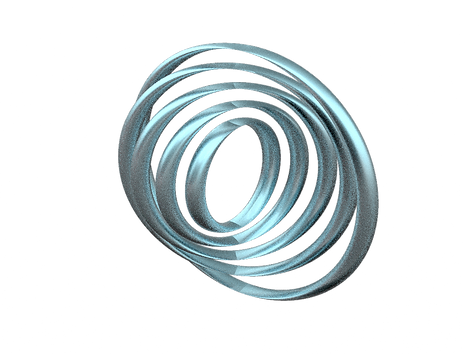
The second part had us choose one of the assignments that we had previously done and use it to change the structure. I had gone with re-doing the Mashrabiya assignment. I thought that the original intent of the structure wasn't the best idea as there wasn't much privacy. So I changed it to be used more in a social gathering setting. With the openness of the structure I wanted to take advantage of that and recreate a screen. The spiral pattern was chosen to look elegant and have beautiful shadows casted upon when stuck by the sun.